Step 1: Go to CRM Integrations & Click Connect on Zoho
Log in to your No2Bounce account. In the left sidebar, click Email Validations, then select the CRM Integrations tab at the top of the page.
You will see integration options like Salesforce, Zoho, and HubSpot. Click the Connect button on the Zoho card to begin the authorization flow.
.png)
Step 2: Sign In to Your Zoho Account
You will be redirected to Zoho's secure authentication page. Enter your Zoho email address or mobile number and click Next to proceed with your password.
Alternatively, use one of the social sign-in options: Google, Apple, Yahoo, Facebook, LinkedIn, X (Twitter), or Microsoft. If you don't have a Zoho account, click Sign up now to create one for free.
.png)
Step 3: Grant CRM Access Permissions
After signing in, Zoho will display a permissions consent screen showing what No2Bounce is requesting access to. The permissions include:
- Group scope to perform CRUD operations on CRM metadata
- READ access to fetch data using CRM Object Query Language
- Perform CRUD operations on CRM modules (Contacts, Leads, Accounts)
- Group scope to update records in bulk
Check the "I allow No2Bounce to access the above data from my Zoho account" checkbox, then click Accept. You will be automatically redirected back to No2Bounce.
.png)
No2Bounce only accesses your CRM data to read contacts and write validation results back. Your data is never shared with third parties.
Step 4: Zoho Is Now Connected: Click Import List
Once authorization is complete, you are redirected back to No2Bounce's CRM Integrations page. The Zoho card now shows a green CONNECTED badge in the top right corner, and two new action buttons appear:
- Import List: opens the Zoho Integration contact management view
- Disconnect: safely unlinks your Zoho account at any time
Click Import List to proceed to the next step.
.png)
Step 5: Select Columns & Load Your CRM Data
The Zoho Integration page opens with module tabs at the top: Home, Leads, Contacts, and Accounts. Select the module containing the records you want to verify.
Under Choose Columns, click the dropdown to select which fields to import. At minimum, select the Email column. You may also add Last Name, Full Name, First Name, or any other relevant fields for context. Then click Load Data to preview your records.
.png)
Step 6: Select Records & Click Validate Now
Your contacts load in a table showing all selected columns. Use the checkboxes to select individual records, or click the top checkbox to select all at once. You can also use the search or filter bar to narrow down specific contacts before selecting.
Once your selection is ready, click the Validate Now button in the upper right corner to begin the email verification process.
.png)
Step 7: View Validation Results & Download Report
After clicking Validate Now, you are redirected to the Validation Progress page. A circular progress indicator shows real-time completion percentage. Once complete (100%), results are displayed and automatically written back to your Zoho CRM records.
The results summary breaks emails into three categories:
- Deliverable: valid, safe to send
- Risky: catch-all or uncertain
- Undeliverable: invalid, do not send
A Download Report option is available for 7 days after each run. The Validation History table below logs every past run, showing date, source, number of records, deliverable / risky / undeliverable counts, status, and a download link.
.png)
Exported Fields in Zoho CRM
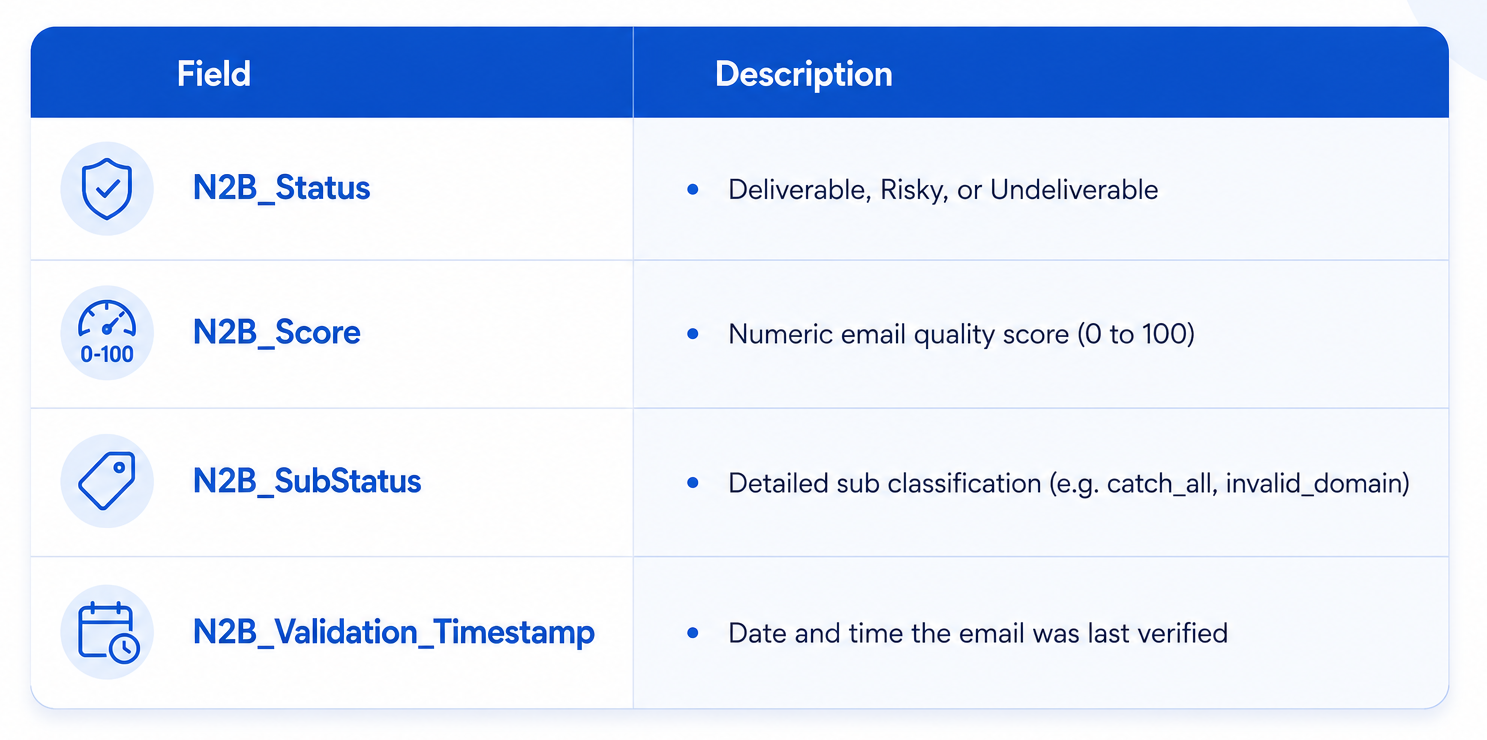
After validation completes, the following fields are written back to your Zoho CRM contact records automatically:
Catch-All Email Verification
When the Catch-All option is enabled during validation, No2Bounce performs a deeper check on domains that accept all incoming mail, helping you identify higher-risk addresses that a standard check may mark as valid.
- Catch-all verification consumes +1 credit / email
- Results are tagged in the N2B_SubStatus field as catch_all
- You can choose to enable or disable catch-all per validation run